Acknowledgement
It is customary for this
particular section to be written at the end of an article. But in
this instance, I wish to make it quite clear from the start, that it
is only with the encouragement and permission of Hugh Boyd that I am
able to complete this document. Hugh is the first author, with
Jeffery Harrison and Allan Allison, of 'Duck Wings - A Study of Duck
Production'. This supremely useful book was published in 1975 (as a
WAGBI Conservation Publication in co-operation with the Wetlands
Trust) so it has long been out of print and copies are hard to find.
What follows is therefore a summary of the most important and
salient points from this book interspersed with my own personal
experiences and practical advice.
Introduction
Picture the scene. You've
had a successful days wildfowling and you sit down to write up a
brief resume of the day’s events in your diary. The usual details
are included - weather, state of the tide, the location you chose,
maybe a brief line about the flora and fauna you noticed in addition
to the wildfowl. Almost certainly you'll note down the number of
shots you fired as well as specific details about the cartridges you
used and how they performed. But above all, you will record the
species of duck you bag and perhaps their sex.
However, before you close
the book and sit back to enjoy a glass of your favourite tipple,
there remains another piece of information that you can add to the
rich tapestry of material you collect. With practice and experience,
by careful examination of the size, shape and colour of wings
feathers, you can almost always accurately determine the age of
ducks. By that I mean either a Juvenile/First Winter bird or an
Adult.
For you as an individual
this may become another interesting facet to the sport of
wildfowling. Yet when collated at a national level, the resulting
information can prove very useful and beneficial to wildfowl
conservation. It may be used to determine the abundance of each
species, the percentages of duck and drakes and in particular the
proportion of young to adult birds. This ratio is used to understand
breeding success and mortality rates which together act as a measure
of each season productivity. While the BASC maintains a limited
study, it is in the US that the analysis of duck wings is undertaken
on a massive scale. Each season for the last 40 years, up to 100,000
duck wings are examined at 'wingbees' across the flyways and the
resulting data forms an integral part of setting and evaluating
hunting seasons.
Collection and
Preservation
First off, shoot a duck! It
is possible to examine wings while still attached to the bird,
especially if the features are clear cut, but in most cases
manipulation is best achieved by removing them. It is vital that
they are kept in the best possible condition since in some cases you
may be looking for quite subtle feather differences. To this end,
avoid stuffing birds into a game bag or at least ensure that you
smooth the wings against the body before carefully packing away.
For obvious reasons
endeavour to pick the best wing from each bird. If both are badly
smashed or particularly muddy, you are better off discarding them
rather than risk making an incorrect judgement. By all means have a
go, but be very cautious about your conclusions.
Try and cut the wing off
neatly at the shoulder (kitchen scissors are very effective) and if
possible try and take the fold of skin to which the scapulars are
attached (see Figure 1). Inevitably some wings will be wet,
bloodstained and muddy, the later being the most problematic and
unfortunately not uncommon problem when shooting in an estuary. So
once removed, they should be air dried as soon as possible. This is
very important because feather shape can be altered in appearance
when it is wet. One word of caution, I have found it's best not to
place them on a radiator as the consequences of forgetting you've
done so can be quite aromatic. When dry, soiling can sometimes be
removed using a soft brush making sure you sweep with the lye of the
feathers. Remember though, wings and feathers may be quite tough and
resilient, but keep handling to a minimum to avoid disrupting
important features
If you are not going to
examine or 'read' the wing immediately, the most convenient form of
preservation is freezing. Simply pop it into freezer bag, make sure
you label it (date, species and sex), and find somewhere in the
depths of your freezer that the wife won't object to you using. In
this state it is possible to store wings indefinitely and if you
collect your best examples for each species, you'll soon have a
useful reference collection. Alternatively, you can take photographs
and if you have a digital camera and PC store the images in your own
virtual gallery but you'll need to take good quality close ups for
this to be effective.
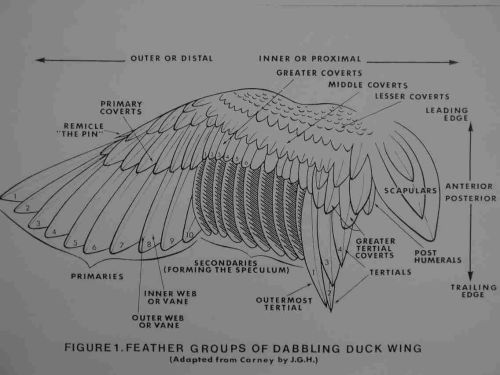
Figure 1 Feather Groups
of Duck Wing
Sequence of Plumage
change
Close study of feather
changes between Juveniles and Adults over many years has ensured
that for most species the exact sequence is known and can be used to
determine age. Juveniles, be they duck or drake, have plumage
markings broadly similar to adult females of the species. Often the
only clear differences are that juveniles have less defined markings
and appear slightly duller. Once fledged the young ducks will
undergo a moult into their first winter plumage.
It is not possible to give a
precise timing for this moult, other than to say it will occur some
time between September and January. This is due to variables such as
the date of hatching, environmental conditions and the physical
condition of each bird. For this reason it is likely you'll see all
stages of the moult sequence throughout the course of a typical
wildfowling season.
Fortunately though, the
majority of juvenile wing feathers are retained until the bird is
around one year old. Which means that although it will have
undergone a full body moult in this time, it should still be
possible to tell it apart from adult birds (more than one year old).
Perhaps the single most
important fact to remember is that the presence of just one of these
juvenile feathers is enough evidence that the bird is not yet adult.
So once you found one, you need not examine any more, save for your
own interest.
Moult Sequence from
Juvenile to First Winter
Primaries Not Moulted
Secondaries
(speculum) Not Moulted
Primary
Coverts Not Moulted
Lesser
Coverts Not Moulted
Middle
Coverts Not Moulted
Greater
Coverts Not Moulted
Tertials
Moulted
Greater Tertial Coverts
Moulted
Post Humerals
Moulted
Scapulars Moulted
There are two important
caveats to this sequence of events. Firstly, if feathers are damaged
and then lost from the wing they may be replaced by feathers of the
next sequence ie adult. So it is possible to see adult features that
should not have normally moulted on a duck that is very clearly
Juvenile/First winter. Secondly, the plumage of adult females that
have bred late may become badly worn and as you will see later,
feather wear can be indicative of juvenile birds.
Age Differentiation
The basis for the
examination is to follow a wing 'key' which describes wing features
and how they appear dependant upon age. So, with reference to Figure
1, simple work your way down the list checking for the specific
identifying characteristics. You will see that although most feather
groups are included in each key, they may not necessarily be listed
in the same order. This reflects those feathers that are the most
practical and give the most definitive diagnosis for each species.
While you may only need to refer to a few of these when examining
early season birds, as winter progresses and new feathers are grown
it will become increasingly necessary to examine all the listed
groups. If you are unsure if a listed feature is identical to the
one you see, move onto the next one. It is not necessary to get a
perfect match for them all, one 'hit' of a juvenile feather is
diagnostic.
Drake Wigeon
By far the easiest duck to
age is the cock Wigeon, which can be readily identified by a single
feature. For the sake of completeness though, the whole key is
included together with images of Adult and First Winter birds (see
Images 1 and 2).
|
1. LESSER AND
MIDDLE COVERTS
|
|
|
a. Brownish-grey with
dusky barring and narrow buff edge to posterior rows of middle
coverts
|
Juvenile/First Winter |
|
b. Greyish-white with
dusky margins and barring
|
Juvenile/First Winter |
|
c. Brownish-grey with
newly moulted white feathers (rare)
|
First Winter |
|
d. White; anterior
lesser coverts forming grey, sometimes vermiculated leading edge
to wing |
Adult
*** |
|
|
|
|
2. GREATER COVERTS
|
|
|
a. Greyish-brown with
darker sub-terminal and white terminal bar
|
Juvenile |
|
b. Dirty white with dull
black sub-terminal bar
|
First Winter |
|
c. White, with black
terminal bar |
Adult |
|
|
|
|
3. SECONDARIES
(SPECULUM)
|
|
|
a. Anterior quarter
metallic green except on outer two/three feathers, remainder
dull black with narrow white trailing edge
|
Juvenile/First Winter |
|
b. Anterior half
metallic green, posterior half glossy black |
Adult |
|
|
|
|
4. TERTIALS
|
|
|
a. Short, dark brown
with darker outer vane and narrow white and frayed outer margin.
Broad greyish-white band on outer vane of first tertial
|
Juvenile/First Winter |
|
b. Long, lanceolate and
pointed, outer vane black with well defined smooth white margin,
inner vane grey, shaft white. Broad white band on outer vane of
first tertial
|
Adult |
|
5. SCAPULARS
|
|
|
a. Dark brown with paler
margins
|
Juvenile |
|
b.Vermiculated, grey and
white |
Adult |
|
|
|
|
6. GREATER
TERTIAL COVERTS
|
|
|
a. Brown, with pale
frayed margin
|
Juvenile/First Winter |
|
b. Grey, with white
smooth margin |
Adult |
***
The fully white shoulder
(lesser and middle coverts) of the adult is usually obtained during
the first summer moult. So if present, this is sufficient evidence
to classify any drake Wigeon. It has been noted however that the
coverts of Juvenile/First Winter birds can become whiter during the
season as a result of colour change without moult. But never to the
extent that they could be confused with the bright white coverts of
an adult.
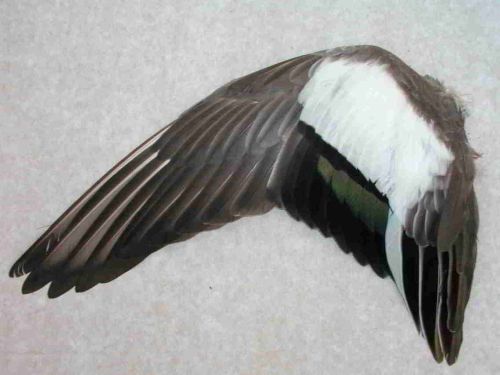
Image 1 Adult Drake
Wigeon
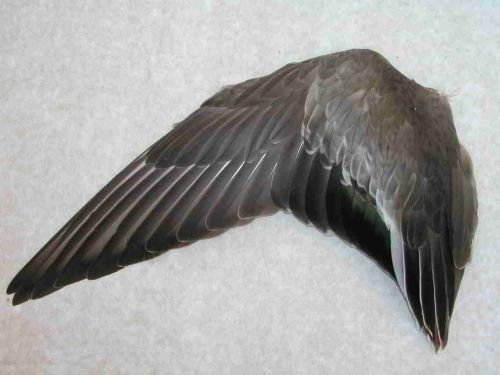
Image 2 First Winter
Drake Wigeon
Discussion
Although the images have
been degraded to reduce file size, the differences between some of
the feather groups are still clearly visible. The white shoulder of
the adult with its grey leading edge contrasts strikingly with that
of the juvenile (part 1 of key) which is why this single feature is
so useful in distinguishing the two. You can also see the reduced
amount of metallic green present on the speculum of the juvenile
compared to the adult (part 3 of key). Finally, though it’s not so
clear, compare the tertials of the juvenile and adult. You will
hopefully see that the tertials of the younger bird are not black
and have a narrow white and frayed outer margin (part 4 of key).
|