
Pattern and Penetration
Testing
Rob Douglas
takes an analytical view |
 |
What is more important to the wildfowler? Patterns or penetration? You need both! You need sufficient pellet energy to penetrate the feathers and skin and then to penetrate through muscle, bone and organs. You also need a sufficient number of those high-energy pellets to ensure multiple penetration through those vital areas.
In this short article, I hope to show you the value of carrying out your own, thorough patterning and your own penetration tests as well as telling you how to do your own tests.
Pattern testing, is, for me, an essential part of my non-toxic shot studies. Before I carry out any field-testing, I need to know what I can expect in terms of pellet count for each load/gun/choke combination that I might use.
I use a system of pattern testing that gives me the maximum amount of information without being too time-consuming either in implementation or in subsequent analysis.
PATTERN TESTING.
(Methodology)
My targets for the tests in 2001 were made out of 12 x A3 (420 mm x 267 mm) sheets of paper sellotaped together. This gave me a sheet approximately 1068mm x 1260 mm which is about 49" x 42". This year I am using Kraft paper (brown wrapping paper) purchased in rolls of 250 metres x 600 mm.
Wind off lengths of approximately 1068 mm and cut. Two of these sheets 1068 x 600, joined together make a sheet of 1068 x 1200 which, give or take the odd mm, is the same as 12 sheets of A3 paper to make one target.
VIKING DIRECT, www.viking-direct.co.uk, sells a roll of the above size for approx. £25 including VAT.
One roll makes - approx. 117 targets.
The distance from the muzzle to the target was a measured 40 yards. Do not guess; use a tape measure to ensure the correct yardage.
All my pattern testing has been carried out in the early mornings on days with no perceptible wind. (Beaufort Wind Scale <=2).
I aim at what I perceive as the centre of the target. The gun was rested on a polystyrene filled bag when fired at the target.
I fire a ten shot series, one shot for each individual target, as this number will give a reliable indication of what one can expect.
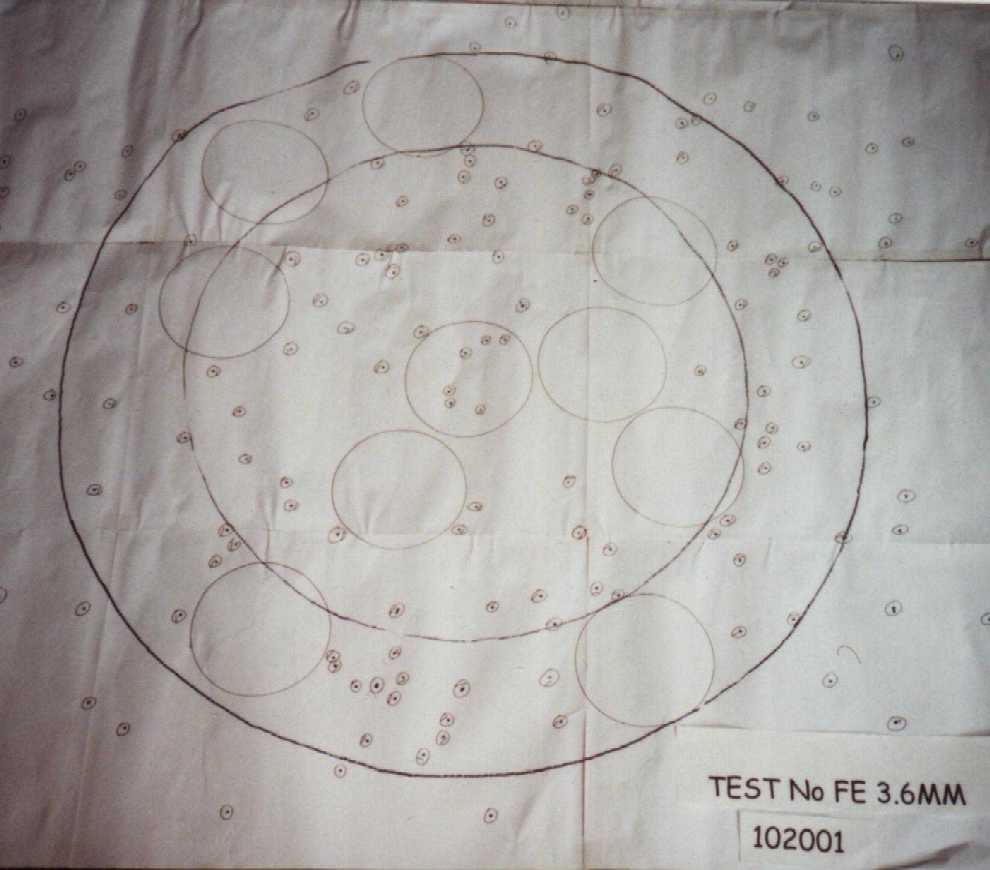
Each resulting pellet hole on the target sheet is circled in black ink. A 12 cm (4.75”) circle (using a compact disk) is drawn in what I judge to be the centre of the pattern. A small dot is placed in the centre of this circle. A template, 30" in diameter is placed over the centre of the pattern (using the black dot for alignment) and a black line drawn around it. Another template, 20" in dia. is then placed over the centre of the pattern and a black line drawn around it. Thus, within a 30" dia. circle, I had a 20" dia. circle (concentric) and also a 12 cm (4.3/4") circle (concentric) in the centre.
First, I count the pellet holes in the "fringe area" …this is the area between the 20" dia and the 30" dia circles. I ensure correct counting by marking off groups of five holes at a time and jotting a “tally mark” for each. I then count the number of holes within the 20" dia circle; again using tally marks in a notebook. I also draw 12 cm circles, around any pellet-free areas within the 30" dia circle.
Results are given in a table with the following information: test number, cartridge, load, nominal pellet count , nominal shot size given by the manufacturer, diameter of pellet in mm, choke used, number of 12cm pellet-free patches within the 30" dia circle, number of pellets within the centre 12cm circle (which is of course included again when counting pellets in 20" and 30" dia. circles), number of pellets in the 20" dia. circle and the number of pellets in the fringe area between the 20" and 30" dia. circles. Thus we can add these last two and obtain the number of pellets within the 30" dia. circle. Finally, I calculate the percentage of pellets within the 30" diameter circle.
That is all there is to it – simple!
Once you have carried out your pattern tests and counted the pellet holes within the 20” and 30” diameter circles you can tabulate the results and compare them with ten shot series of other shot types and diameters.

There are 101 pellets within the 30” diameter circle and 72 of these pellets are within the 20” diameter circle. This pattern is too tight; unless one is an outstanding marksman one is more likely to wound than kill. I’ll define here my definition of an outstanding marksman: one that can consistently shoot better than 90 x 100 in a demanding sporting clay layout.
There are a similar number of pellets (100) within the 30” diameter circle, but the pellets are more evenly distributed. This tolerates greater shooter error and is a killing rather than crippling
pattern.
Both patterns were obtained using the same choke – modified – using a Mossberg 835 Ulti-Mag.
Both 4mm steel and 3.6mm steel have sufficient energy to penetrate the vital areas of a mallard at 40 yards; in fact 4.00mm steel will penetrate the vital areas of a greylag at 40 yards.
However, as photo No 1 clearly shows, steel in 4.00mm using that particular choke constriction will wound more than kill, as the pattern is too tight.
By pattern testing, I was able to determine that 3.6mm steel, using the same choke would give me a similar pellet count in the 30” diameter circle at 40 yards…but most importantly the pellets would be more evenly distributed.
For any given choke I have found that the steel patterns tighter the larger the diameter pellet.
Unless you take the trouble to pattern your gun with the ammunition you intend to use you will have no idea what pattern density (pellet count) to expect. It is important not to rely on general Tables, such as those found in the Eley Shooters diary.
“Choke” is often used to designate the amount of constriction at the end of your shotgun barrel. It is also used to indicate the percentage of pellets shot into a 30” diameter circle at 40 yards by that constriction. I can tell you that, most often, the two are seldom the same! With one of my chokes for example, three quarter choke (measured 27 thou), I can get pattern densities as low as 45% and as high as 80% depending on the ammunition I feed that choke.
Out of respect for the quarry you hunt, you should know what patterns you will be getting. Crippling can be caused by too many pellets in a concentrated area within a 30” diameter circle as well as insufficient number of pellets within that circle. You want a sufficient number of pellets as evenly distributed as possible.
With some of my choke/load combinations, I can get 85% + patterns. These are commercial loads – I am not a homeloader. I will not use these ultra-high patterning combinations on live quarry, as there is more chance of wounding with too tight a pattern.
To obtain the flexibility of matching choke to the variety of modern non-toxic loads, my recommendation is this: forget your side-by-side and buy either a pump, semi –auto or over-and-under with a variety of chokes proofed for high performance steel shot. This will give you the flexibility to use steel, tungsten-iron, Hevi-Shot as well as the “soft” metals such as bismuth, ITM and tin and the latest metal alloys currently in the development stage.
Penetration
I believe that carrying out comparative testing of different shot types into a tissue simulant and then investigating the penetrative performance of those shot types acts as an invaluable guide to the selection of shot type and size for most quarry species. Of course this is not the only information required, pattern testing of various shot types should run parallel with penetration tests as indicated earlier.
Methodology
Telephone directories have been used for many years as a tissue simulant. Douglas McDougal 2 mentions the extensive use of telephone directories in his testing. McDougal does not say whether he pre-soaked his directories. Eley Hawk, who use telephone books in their penetration tests, do pre-soak their directories. In my opinion one should pre-soak the directories. If one does not soak the directories the pellet bursts rather than penetrates the page due to the low moisture content of the page (approx. 6% moisture). One is, after all, trying to simulate tissue and tissue contains a lot of moisture. I fully appreciate that the penetration of pellets into a telephone directory is a comparative test but pre-soaking to obtain 100% water saturation is, I believe, the nearest layman’s option to live tissue.
First get hold of sufficient telephone directories!
A note of caution here – for lead shot in diameter 2.8mm and above and for steel shot 3.25mm and above I use Aberdeen Yellow Pages as these have approximately 1000 pages. Highlands & Islands directories only contain 390 pages – only enough pages for small shot sizes.
I remove both front and back covers from each yellow pages directory. I also remove the first 16 pages, which are a different weight/thickness of paper than the rest. I also remove a thick card half way through the directories. Thus I am left only with pages of the same weight/thickness. (The page thickness, when measured, appeared to be approximately 65µm)
Each morning, one hour before testing, the telephone directories are placed in a barrel of water, allowing 100% saturation of the paper fibres.
Each directory is removed from the barrel and excess water allowed to drain. I then open the directory approximately half way through and hang it over a 20-pound braided fishing line suspended between two posts.
I fire from a measured 40 yards and aim at what I consider the centre of the directory. The gun is rested on a polystyrene filled bag when fired at the target:
After each test "session", the directories are taken back to my house for pellet counting. I simply turn pages until the point where a pellet or pellets have penetrated a certain page. The page number and number of pellets (found embedded on that page) are recorded.
After each pellet is accounted for in each directory, I make the following calculation.
As an example, I show below results from, my own testing. Three pellets were found on page 509. As the first 16 pages had been removed.... 509 - 16 = 493. But these are page numbers, so to find the number of sheets penetrated I divided 493 by 2 = 246.5. I recorded this as 246 (noted in the results three times as there were three pellets on the page.)
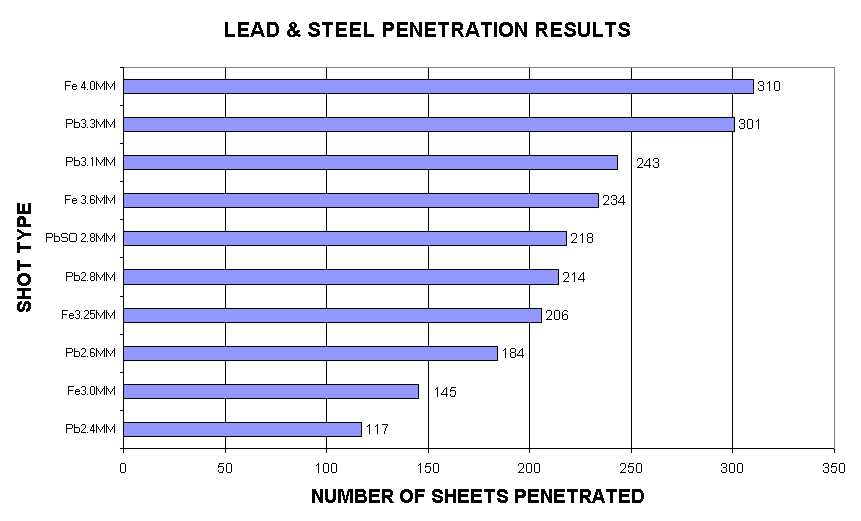
CARTRIDGE USED
Fe 4.0mm =Hull Solway Steel No 1 (4.0mm/0/16”) 3” 34 gram
Pb 3.3mm =Lyalvale Super Game Lead No 3, (3.3mm/0.13”) 2 ¾” 42 gram
Pb 3.1mm =Gamebore Buffalo Lead No 4, (3.1mm/0.12”) 2 ¾” 32 gram
Fe 3.6 mm = Hull Solway Steel No 3 (3.6mm/0.14”) 3” 34 gram
Pb SO 2.8 mm = Lyalvale Express Somerset High Pheasant 2 ¾”No 5 (2.8mm/0.11”) 36 gram
Pb 2.8 mm = Gamebore Mammoth No 5 (2.8mm/0.11”) 2/3/4” 36 gram
Fe 3.25mm = Hull Solway Steel No 4 (3.25mm/0.13”) 3” 34 gram
Pb 2.6mm = Lyalvale Super Game No 6 (2.6mm/0.10”) 2 ¾” 36 gram
Fe 3.0mm = Hull Game Steel No 5 (3.0mm/0.12”) 2 ¾” 32 gram
Pb 2.4mm = Hull Three Crowns No 7 (2.4mm/0.095”) 2 ½” 28 gram
Penetration Profiles
Chart No 1 showed the average penetration for each cartridge type tested. What I was particularly interested in is what I describe as the penetration profile. That is the variation of pellet penetration within the shot cloud and whether one could thus estimate the potential penetration profile for a given load.
It has been demonstrated by Compton & Giblin3 that individual pellets within a shot cloud travel at varying velocity, and thus there will be a difference in the terminal velocity and energy of pellets within the shot cloud. Examples of differences in leading and trailing edge velocities and energy are shown in their report.
Where Compton and Giblin illustrated a shot cloud profile as “ a side on view of the shot cloud in space”, I wanted to show a side-on view of the penetration of the shot cloud.
They went on to say “The shot cloud profiles offer unprecedented detail in the quality control information that it can give, particularly with regard to the pellet energy variation within the shot cloud. (my Italics).
They also made the point that their studies showed that there was no single value for the flight time of a given load to a particular range and that there can be significant differences between flight times of leading and trailing edge pellets in the shot cloud. Thus there can be no single velocity for a given range. They went on to show large calculated differences in the kinetic energy between leading and trailing edge pellets.
In one example at 40 metres they calculated a difference of 20% in pellet kinetic energy between leading and trailing edge pellets. This possibly making part of the shot cloud ineffective.
Unfortunately, the significance of shot cloud profiles and the variability of pellets within the shot cloud appears largely to have gone unnoticed by the great majority of shooters.
Most shooters, probably unconsciously, assume that each and every pellet within the shot cloud has the same velocity and energy value at a given range.
I have prepared dozens of penetration profile charts based on my penetration tests. These profiles give a clear indication of the penetrative potential of various shot types.
To illustrate this penetrative potential, chart No 2. below clearly demonstrates that the minimum penetration of steel in diameter 4.00mm is greater than the maximum penetration of lead in 3.1mm.
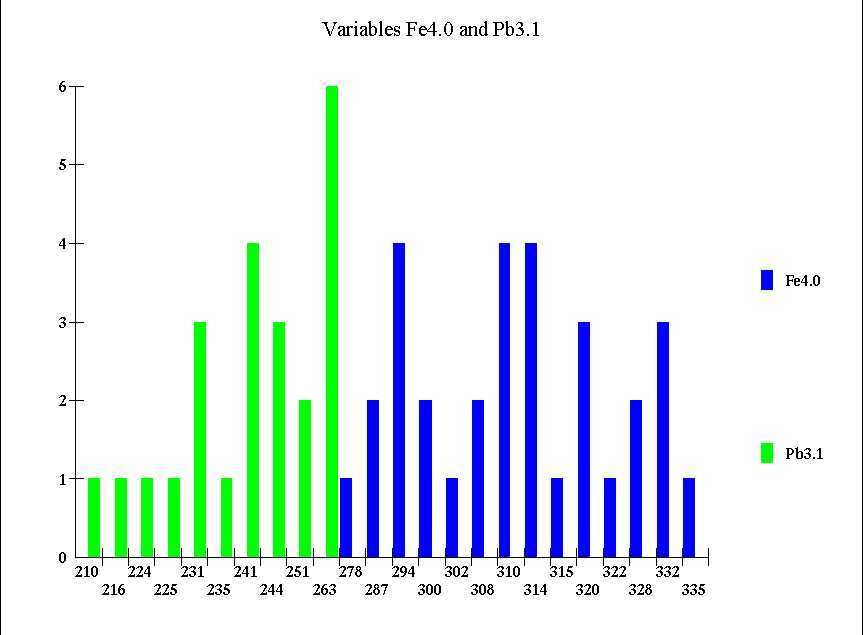
Penetration of pellets through a wet telephone directory.
Y axis = No of pellets embedded in specified sheet.
X axis = No of sheets penetrated.
I have used these “profiles” to guide me in my shot selection for further trials in the field.
In my quest for knowledge about the effectiveness of non-toxic loads I also needed to investigate the effectiveness of the lead loads they will replace.
Thus, when my testing is complete, I hope to be able to choose with certainty the most effective non-toxic load, not only for waterfowl but for other species, as I suspect that, in my lifetime, there will be a total ban on the use of lead shot in the United Kingdom.
|
For the
widest selection of shooting and fishing books,
Click Here
Gundog Training Broadsheets
[return] |